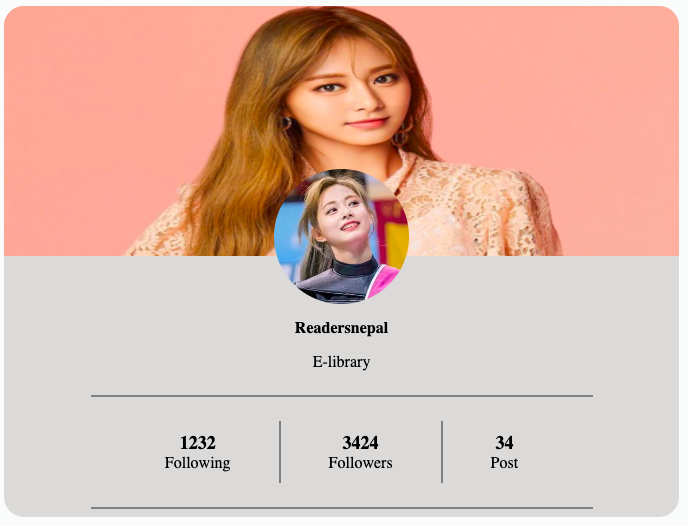
Social media profile page using HTML and CSS
HTML and CSS are the basic foundation for any web development. From very simple static web page to complex web application both HTML and CSS are used. It’s very necessary for any web developer to know fundamentals of HTML and CSS. One can make beautiful and attractive design using these two tools. Here in this post I am going to illustrate how you can design a stylish social media profile card using only HTML and CSS. Simply follow the steps below to successfully create your one.

Software requirements.
- VS Code or any other text editor to write code.
- Any Web browser to view the output of our web page
How to create social media profile page?
Step 1: Create a folder on the desired location and named it as per your wish.
Step 2: Create two file inside the folder one for HTML and another for CSS.
Note: HTML file has .html extension whereas CSS file has .css extension. Give any name to both the file. If you also just copy all the code don’t forget to change the name of CSS file in the HTML link tag. This code is the example with HTML filename profile.html and CSS filename profile.css.
Step 3: Copy the following code in your HTML file and save it.
<html>
    <head>
        <link rel="stylesheet" href="profile.css">
        <title>Profile Card</title>
    </head>
    <body>
        <div class="profilecard">
            <div class="infoimages">
                <img src="cover.jpg">
                <img src="profile.jpg">
            </div>
            <div class="profileinfo">
                <span>Readersnepal</span>
                <span>E-library</span>
            </div>
            <hr>
            <div class="followerinfo">
                <div class="following">
                    <span>1232</span>
                    <span>Following</span>
                </div>
                <div class="vl"></div>
                <div class="follower">
                    <span>3424</span>
                    <span>Followers</span>
                </div>
                <div class="vl"></div>
                <div class="post">
                    <span>34</span>
                    <span>Post</span>
                </div>
            </div>
            <hr>
        </div>
    </body>
</html>
Step 4: Copy the following code in your CSS file and save it.
body {
    background-color: rgb(250, 252, 252);
}

.profilecard {
    background-color: rgb(219, 218, 217);
    display: flex;
    flex-direction: column;
    gap: 1rem;
    width: 50%;
    border-radius: 20px;
    overflow-x: clip;
}

.profileinfo {
    display: flex;
    flex-direction: column;
    justify-content: center;
    align-items: center;
    gap: 1rem;
    margin-top: 7%;
}

.profileinfo>span:nth-of-type(1) {
    font-weight: bold;

}

.followerinfo {
    display: flex;
    gap: 3rem;
    justify-content: center;
    align-items: center;

}

.following {
    display: flex;
    flex-direction: column;
    align-items: center;
}

.following>span:nth-of-type(1) {
    font-weight: bold;
    font-size: large;
}

.follower {
    display: flex;
    flex-direction: column;
    align-items: center;
}

.follower>span:nth-of-type(1) {
    font-weight: bold;
    font-size: large;
}

.post {
    display: flex;
    flex-direction: column;
    align-items: center;
}

.post>span:nth-of-type(1) {
    font-weight: bold;
    font-size: large;
}

.vl {
    height: 60px;
    border: 1px solid grey;
}

hr {
    border: 1px solid grey;
    width: 500px;
}

.infoimages {
    display: flex;
    flex-direction: column;
    justify-content: center;
    align-items: center;
    position: relative;
}

.infoimages>img:nth-of-type(1) {
    width: 100%;
    height: 250px;
}

.infoimages>img:nth-of-type(2) {
    width: 20%;
    border-radius: 50%;
    position: absolute;
    bottom: -3rem;
}
Step 5: Also copy two images that you like in the same folder with HTML and CSS file.
Note: In the code I have used image name cover.jpg and profile.jpg
Step 6: Double click on profile.html to open and view you final output.


